

A contact form is one of the most useful features you can add to a WordPress website. It gives visitors an easy way to send questions, request services, provide feedback, ask for quotations, or contact your business without publicly displaying your email address.
Contact Form 7 is one of the most widely used WordPress plugins for creating and managing contact forms. It is free, open-source, flexible, and can be used to create simple forms as well as more customized forms. The official WordPress plugin directory currently lists 10+ million active installations.
In this guide, you will learn what Contact Form 7 is, how to install it, how to create a contact form, how to customize fields, configure email notifications, publish the form on a page, and test whether submissions are working correctly.
What Is Contact Form 7?
Contact Form 7 (CF7) is a free WordPress plugin that allows website owners to create contact forms and place them anywhere on their websites.
Instead of asking visitors to open their email application, you can provide a form containing fields such as:
- Name
- Email address
- Phone number
- Subject
- Message
- Website URL
- File upload
- Checkbox
- Radio buttons
- Dropdown menus
- Acceptance checkbox
The plugin is designed to be simple but flexible. It uses form tags and templates rather than relying entirely on a visual drag-and-drop builder. The official documentation provides instructions for creating forms, configuring mail, editing messages, adding fields, and connecting external services.
Why Should You Use Contact Form 7?
There are several reasons website owners choose Contact Form 7.
1. It Is Free
Contact Form 7 is distributed under the GNU General Public License and can be downloaded from WordPress.org.
You can create contact forms without purchasing a premium form-builder subscription.
2. It Is Lightweight and Flexible
CF7 gives you control over the form structure, fields, validation, and email settings. This makes it useful for bloggers, businesses, agencies, service websites, portfolios, and many other WordPress sites.
3. Multiple Forms Can Be Created
You are not limited to one contact form. For example, you can create separate forms for:
- General inquiries
- Sales inquiries
- Support requests
- Job applications
- Quote requests
- Customer feedback
The official getting-started documentation explains that multiple contact forms can be managed from the WordPress administration area.
4. It Supports Different Field Types
You can create text fields, email fields, number fields, dates, checkboxes, radio buttons, menus, file uploads, acceptance fields, and more.
5. It Can Be Extended
Contact Form 7 supports integrations and extensions for services and features such as:
- Akismet spam filtering
- Cloudflare Turnstile
- reCAPTCHA
- Brevo
- Stripe
The available integrations can change over time, so check the official documentation before installing an extension.
What You Need Before Installing Contact Form 7
Before starting, make sure you have:
- A WordPress website.
- Administrator access to the WordPress dashboard.
- Permission to install plugins.
- A working email address for receiving form notifications.
- A page where you want to display the contact form.
If you are using WordPress.org/self-hosted WordPress, you can normally install the plugin from Plugins → Add New Plugin.
How to Install Contact Form 7 in WordPress
Step 1: Open the WordPress Dashboard
Log in to your WordPress website.
Your dashboard normally looks similar to:
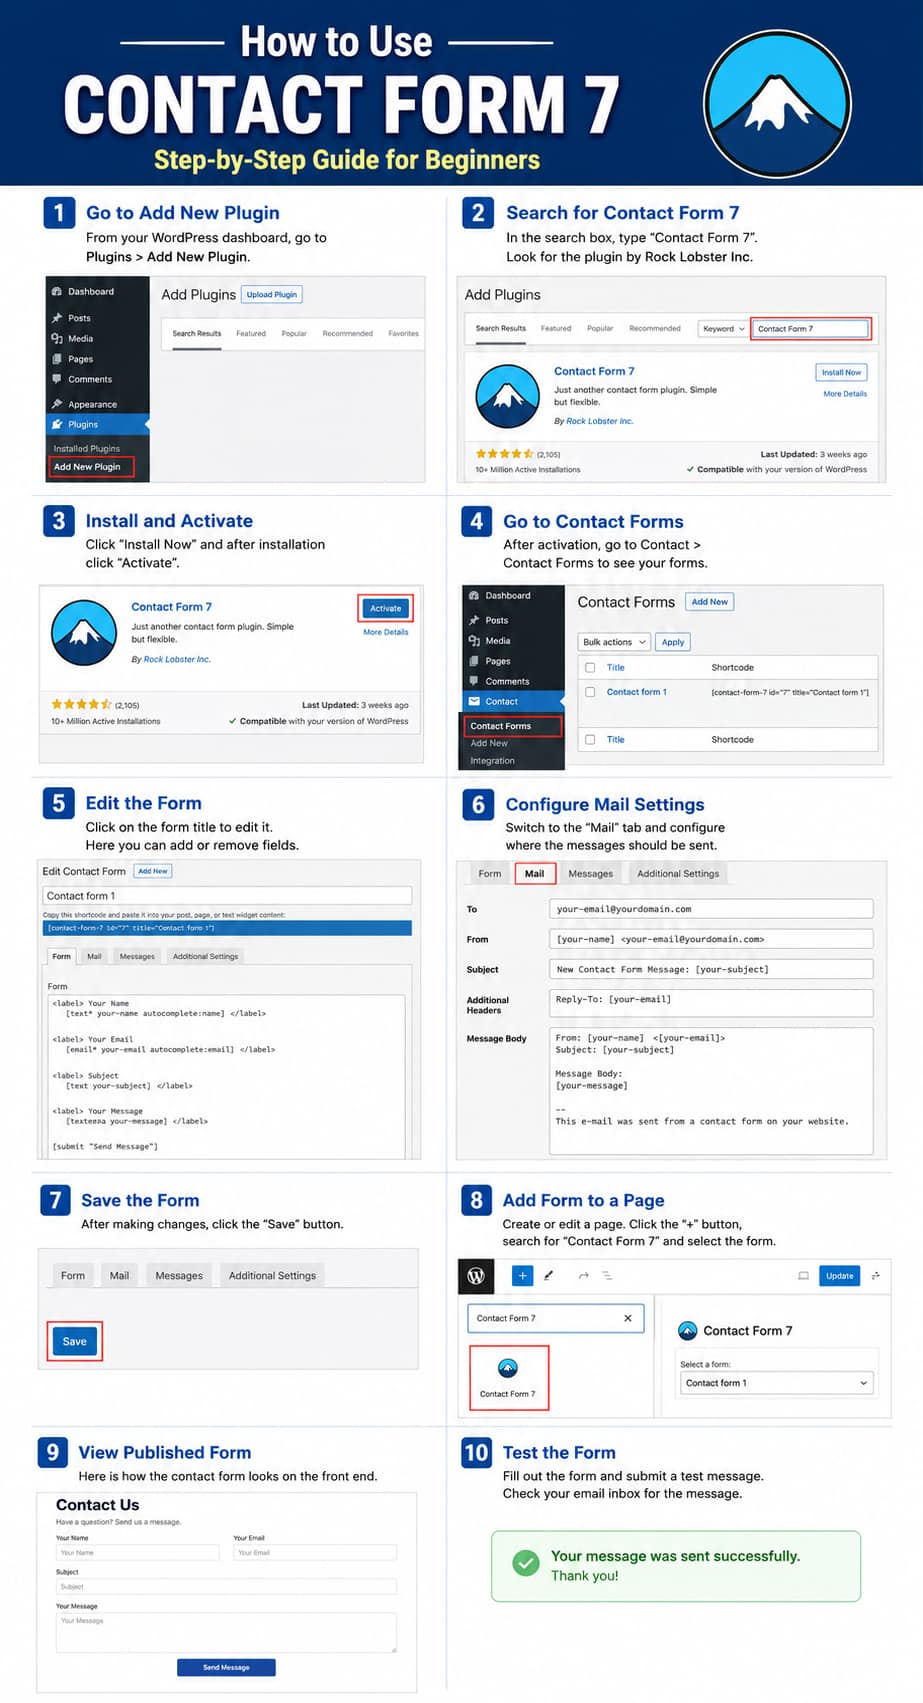
WordPress Dashboard → Plugins → Add New Plugin
Open Add Plugins
WordPress Dashboard showing the Plugins menu and Add New Plugin option.
Open Plugins → Add New Plugin from your WordPress dashboard.
Step 2: Search for Contact Form 7
In the plugin search box, type:
Contact Form 7
Look for the official plugin published by Rock Lobster Inc.
The official WordPress directory identifies Contact Form 7 as a plugin by Rock Lobster Inc.
Search for the Plugin
WordPress plugin search results showing Contact Form 7.
Suggested caption:
Search for Contact Form 7 and verify the official plugin before installing it.
Step 3: Install the Plugin
Click:
Install Now
Wait for WordPress to complete the installation.
Then click:
Activate
After activation, a new Contact menu should appear in your WordPress dashboard.
Install and Activate
Contact Form 7 plugin card with Install Now and then Activate.
Suggested caption:
Install Contact Form 7 and activate it from the WordPress plugin screen.
How to Create Your First Contact Form
After activation, open:
Contact → Contact Forms
Contact Form 7 normally creates a default contact form after installation. The official guide describes a default form named Contact form 1.
Contact Forms Screen
WordPress dashboard showing Contact → Contact Forms and the default form.
Suggested caption:
Open Contact → Contact Forms to manage your Contact Form 7 forms.
Step 4: Open the Default Form
Click the name of the form to edit it.
You will normally see different sections or tabs for configuring the form and its email settings.
The Form section controls what visitors see.
A basic form can contain fields such as:
<label> Your Name[text* your-name autocomplete:name]
</label> <label> Your Email
[email* your-email autocomplete:email]
</label> <label> Subject
[text* your-subject]
</label> <label> Your Message
[textarea* your-message]
</label>
[submit “Send Message”]
The exact default template can vary between plugin versions, so use the tags generated by your installed version rather than assuming every installation will look identical.
Understanding Contact Form 7 Form Tags
One important thing to understand about Contact Form 7 is its form-tag system.
A tag tells the plugin what type of field to create.
For example:
Text Field
[text your-name]
Creates a basic text field.
Required Text Field
[text* your-name]
The * indicates that the field is required.
Email Field
[email* your-email]
Creates a required email field.
Message Field
[textarea* your-message]
Creates a required message box.
Submit Button
[submit "Send Message"]
Creates the form submission button.
The official documentation provides detailed information about how Contact Form 7 tags work and how different field types can be added.
Step 5: Create a Simple Business Contact Form
For a business website, you could use a form containing:
- Full Name
- Phone Number
- Subject
- Message
For example:
<label> Full Name[text* full-name autocomplete:name]
</label> <label> Email Address
[email* email-address autocomplete:email]
</label> <label> Phone Number
[tel phone-number]
</label> <label> Subject
[text subject]
</label> <label> Message
[textarea* message]
</label>
[submit “Submit Inquiry”]
This gives visitors a straightforward way to contact your business.
Step 6: Configure Email Notifications
Creating the form is only half of the setup.
You also need to tell Contact Form 7 where submitted messages should be sent.
Open the Mail section of your form.
You will find settings related to:
- To
- From
- Subject
- Additional headers
- Message body
The official documentation includes a dedicated guide for configuring the mail settings.
The “To” Field
The To field determines which email address receives the submitted message.
For example:
To: your-business@example.com
Replace this example with the email address where you want to receive inquiries.
The “From” Field
The From address should be configured carefully.
A typical setup uses an email address associated with your own website domain rather than simply copying the visitor’s email address into the From field.
This can improve email authentication compatibility and reduce delivery problems.
The “Subject” Field
You can create a useful subject line such as:
New Website Contact: [your-subject]
This makes incoming inquiries easier to identify.
The Message Body
The message body can contain the information submitted by the visitor.
For example:
Name: [full-name]
Email: [email-address]
Phone: [phone-number]

Subject: [subject]

Message:
[message]
The exact mail-tags must correspond to the field names used in your form.
Step 7: Save the Form
After configuring the form and mail settings, click:
Save
Always save your form after making changes.
Save Contact Form
Contact Form 7 editor showing the Form and Mail sections with the Save button.
Suggested caption:
Configure your form and email notification settings, then save the changes.
Step 8: Add Contact Form 7 to a WordPress Page
Now you need to display your form on your website.
Create a new page:
Pages → Add New
Give the page a title such as:
Contact Us
Contact Form 7 supports a dedicated block in the WordPress Block Editor. You can use this block to select a form from your available Contact Form 7 forms.
Method 1: Use the Contact Form 7 Block
In the WordPress editor:
- Click the + button.
- Search for Contact Form 7.
- Select the Contact Form 7 block.
- Choose your form.
- Publish or update the page.
Insert Contact Form 7 Block
WordPress Block Editor with the Contact Form 7 block selected.
Suggested caption:
Insert the Contact Form 7 block and select the form you created.
Method 2: Use the Shortcode
Contact Form 7 also supports shortcodes.
The official documentation shows that each form has a shortcode that can be copied and inserted into a page.
A shortcode may look similar to:
[contact-form-7 id="1234" title="Contact form 1"]
Your actual ID will be different.
Paste the shortcode into a Shortcode block or another suitable WordPress editor location.
Step 9: Publish the Contact Page
Once you have inserted the form:
- Add a short introduction.
- Add your contact details if appropriate.
- Insert the Contact Form 7 form.
- Check the page preview.
- Click Publish.
Your page could contain:
Contact Us

Have a question or need assistance?
Send us a message using the form below.

[Contact Form 7]

We will review your message and respond as soon as possible.
Step 10: Test Your Contact Form
Never assume a form works immediately after installation.
Open the published Contact page and submit a test message.
Check:
- Does the form appear correctly?
- Are required fields working?
- Does the email address validate correctly?
- Does the success message appear?
- Does the notification arrive?
- Does the message contain the submitted information?
- Does the form work on mobile?
Published Contact Form
The completed contact form displayed on the front end of the website.
Suggested caption:
Preview the published Contact Form 7 form and submit a test message.
What If Contact Form 7 Emails Are Not Arriving?
One of the most common problems with WordPress contact forms is email delivery.
If the form appears to submit successfully but you do not receive the email, check the following.
1. Check the Mail Configuration
Go to:
Contact → Contact Forms → Your Form → Mail
Review the To, From, Subject, and message settings.
2. Check Your Spam Folder
The notification may have been filtered as spam.
3. Use Proper Domain Email Settings
For business websites, use an email address associated with your domain where possible.
4. Consider SMTP
WordPress sites can sometimes have problems delivering email through the server’s default mail system. An SMTP configuration can improve reliability, depending on your hosting environment.
5. Test Again
After changing your mail configuration, submit another test message.
How to Reduce Spam in Contact Form 7
Public contact forms can attract automated spam submissions.
Contact Form 7’s official documentation includes options and integrations related to spam filtering and CAPTCHA-style protection.
Depending on your requirements, you can consider:
- Akismet
- Cloudflare Turnstile
- reCAPTCHA
- Other compatible anti-spam solutions
Do not add multiple overlapping security systems unnecessarily. Choose a solution appropriate for your website and test it after configuration.
How to Add a Phone Number Field
If your customers need to provide a phone number, add a telephone field.
Example:
<label> Phone Number[tel phone-number]
</label>
You can make it required:
[tel* phone-number]
Use required fields only when the information is genuinely necessary.
How to Add a Dropdown Menu
A dropdown can be useful when visitors need to select a service.
For example:
<label> Select Service[select service “Website Development” “SEO” “WordPress Support” “Other”]
</label>
This can make submissions easier to organize.
How to Add a Checkbox
Checkboxes are useful for collecting selections or confirmations.
For example:
[checkbox services use_label_element
"SEO"
"WordPress"
"Web Development"]
The exact syntax should be generated through Contact Form 7’s field interface when possible.
How to Add a File Upload Field
Contact Form 7 also supports file-upload fields. The official documentation includes file uploading and attachment configuration.
A file-upload field can be useful for:
- Job applications
- Project requirements
- Documents
- Images
- Design briefs
However, configure file types and size limits carefully. Allowing unnecessary file types can increase security and storage risks.
How to Add an Acceptance Checkbox
You may want visitors to confirm something before submitting a form.
For example, you could use an acceptance field for a statement such as:
I agree to the website’s terms and privacy policy.
Contact Form 7 includes an acceptance checkbox feature in its documentation.
Only request consent that is actually relevant to your website and legal requirements.
How to Create a Professional Contact Form
A professional form should be simple.
Avoid asking visitors for unnecessary information.
Recommended basic structure
Name
Required
Email
Required
Phone
Optional unless needed
Subject
Optional or required depending on your business
Message
Required
Submit Button
This structure works well for many small-business websites.
Contact Form 7 and Privacy
Privacy should be considered when collecting visitor information.
The WordPress plugin directory states that, with its default configuration, Contact Form 7 itself does not secretly track users, write personal data to the database, send data to external servers, or use cookies. However, your complete website setup can include other plugins, integrations, analytics systems, hosting services, email services, or spam-protection tools that process personal data.
Therefore, review your overall website privacy requirements rather than assuming the contact form is the only system involved.
Does Contact Form 7 Store Submitted Messages?
This is an important point for beginners.
Contact Form 7 primarily handles form submissions and email delivery. If you want submissions stored in the WordPress database, additional tools can be used.
The official Contact Form 7 documentation includes a topic on saving submitted messages with Flamingo.
This can be useful if you do not want to depend entirely on email notifications.
Contact Form 7 With Elementor
If your WordPress website uses Elementor, you can still use Contact Form 7.
A common workflow is:
- Create the form in Contact Form 7.
- Copy the form shortcode.
- Open your Elementor page.
- Add a Shortcode widget or another compatible method.
- Paste the Contact Form 7 shortcode.
- Preview the page.
- Test the form.
The form itself remains managed from the Contact Form 7 settings.
Advantages of Contact Form 7
Free and Open Source
You can use the plugin without purchasing a premium license.
Flexible
You can build forms using different field types and form tags.
Popular
The WordPress directory currently reports more than 10 million active installations.
Multiple Forms
You can create separate forms for different areas of your website.
Integrations
It supports a range of integrations and extensions, including spam protection and payment-related integrations.
Good for Developers
Users who understand HTML, CSS, and Contact Form 7 tags can customize forms extensively.
Disadvantages of Contact Form 7
Contact Form 7 is powerful, but it is not perfect for every user.
1. No Traditional Drag-and-Drop Builder
Beginners accustomed to visual form builders may find its tag-based system less intuitive.
2. Styling May Require CSS
The plugin focuses on form functionality. Creating a highly customized design may require CSS or theme/page-builder styling.
3. Email Delivery Depends on Your Website Setup
Installing the plugin does not guarantee perfect email delivery. Hosting, DNS, SMTP, and email authentication can affect whether notifications reach your inbox.
4. Advanced Features May Need Extensions
Some advanced functionality requires additional extensions or custom development.
Contact Form 7 vs. Basic HTML Forms
A normal HTML form can display fields, but WordPress form plugins can simplify tasks such as validation, mail configuration, form management, and integration.
Contact Form 7 is especially useful if you want a practical WordPress-native solution without purchasing a premium form builder.
Best Practices for Contact Form 7
Follow these recommendations when creating your forms.
Keep Forms Short
Ask only for information you actually need.
Make Required Fields Clear
Do not make every field mandatory.
Use Helpful Labels
Instead of vague labels such as “Input,” use:
Full Name
Email Address
Your Message
Add Spam Protection
Public forms should have an appropriate spam-protection strategy.
Test Every Form
Submit test messages after installation and after major changes.
Check Mobile Design
Your form should work properly on phones and tablets.
Keep WordPress Updated
Keep WordPress, Contact Form 7, your theme, and other plugins updated.
Use Reliable Email Configuration
For business websites, pay particular attention to email authentication and delivery.
Troubleshooting Checklist
If your Contact Form 7 form is not working correctly, check these items:
- Confirm Contact Form 7 is activated.
- Check the form template.
- Check required field tags.
- Check the Mail settings.
- Confirm the recipient email address.
- Check your spam folder.
- Test from another browser.
- Test on a mobile device.
- Review browser console errors if applicable.
- Check for conflicts with other plugins.
- Check your website’s email/SMTP configuration.
- Review the official Contact Form 7 documentation.
The official support resources include documentation, FAQs, and WordPress.org support forums.
Frequently Asked Questions
Is Contact Form 7 free?
Yes. Contact Form 7 is an open-source WordPress plugin available under the GPL and distributed through WordPress.org.
Is Contact Form 7 good for beginners?
Yes, especially for basic forms. However, its tag-based editing approach can take some practice if you have never worked with form markup before.
Can I create multiple contact forms?
Yes. Contact Form 7 allows you to manage multiple contact forms from the WordPress dashboard.
Can I use Contact Form 7 with Elementor?
Yes. You can commonly place a Contact Form 7 shortcode inside an Elementor page.
Does Contact Form 7 automatically save submissions?
Email notifications are a central part of its normal workflow. If you need database storage of submitted messages, consider a compatible storage solution such as Flamingo.
Can I add file uploads?
Yes. Contact Form 7 supports file-upload fields and attachment configuration.
Can I protect my form from spam?
Yes. Contact Form 7 supports and documents several spam-protection options and integrations.
Final Thoughts
Contact Form 7 is a practical choice for WordPress users who need a free and flexible way to add contact forms to their websites. Its biggest advantage is the amount of control it provides without requiring a premium form-builder subscription.
For beginners, the most important workflow is simple:
Install Contact Form 7 → Create a form → Configure Mail → Add it to a page → Test the submission → Add appropriate spam protection.
Once you understand Contact Form 7’s form tags and mail settings, you can create much more than a basic “Name, Email, Message” form. You can build inquiry forms, service-request forms, application forms, feedback forms, and other customized forms suited to your website.
For the most current features and configuration instructions, use the official Contact Form 7 documentation and the Contact Form 7 WordPress.org page.
SuggestedList for This Article
For a complete visual tutorial, add to your WordPress post:
- WordPress Dashboard → Plugins → Add New Plugin
- Searching for Contact Form 7
- Contact Form 7 Install and Activate buttons
- Contact → Contact Forms
- Contact Form 7 Form editor
- Mail configuration screen
- WordPress editor with Contact Form 7 block
- Published Contact Us page
- Completed form with sample fields
- Successful test submission
These will make the tutorial much easier for beginners to follow and will turn the article into a practical step-by-step guide rather than a basic plugin overview.



Hey
List ailandmarksolution.com in Google’s Search Index so it can show up in online search results!
Submit ailandmarksolution.com here:
helpindex.org