

How to Screenshot on Mac (Complete Step-by-Step Guide for Beginners)
Focus Keyword: How to Screenshot on Mac
SEO Title: How to Screenshot on Mac: Complete Step-by-Step Guide (2026)
Meta Description: Learn how to screenshot on Mac using keyboard shortcuts, Screenshot app, and Preview. This complete guide covers full screen, selected area, window capture, editing, saving, and troubleshooting.
How to Screenshot on Mac
Taking a screenshot on a Mac is quick and easy once you know the correct keyboard shortcuts. Whether you want to capture your entire screen, a specific window, or just part of the display, macOS includes powerful built-in tools that don’t require any additional software.
In this guide, you’ll learn every method to take screenshots on a Mac, where screenshots are saved, how to edit them, and how to solve common screenshot issues.
Why Take Screenshots on a Mac?
Screenshots are useful for:
- Creating tutorials
- Reporting software bugs
- Saving important information
- Sharing conversations
- Capturing receipts
- Making presentations
- Recording online classes
- Creating blog posts
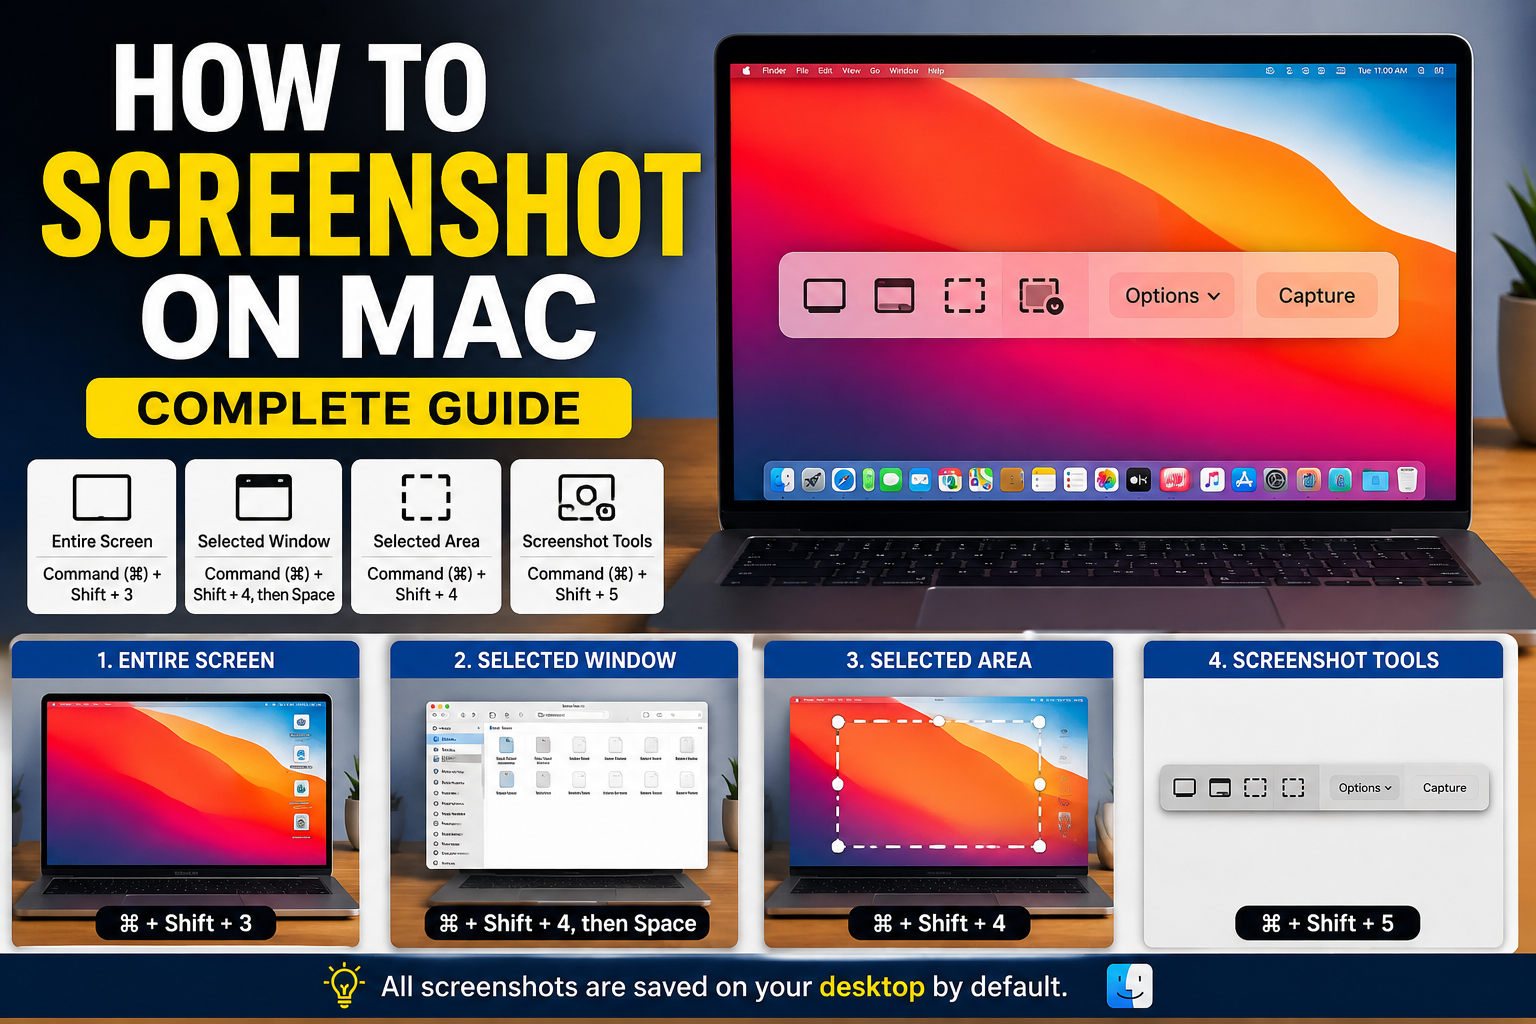
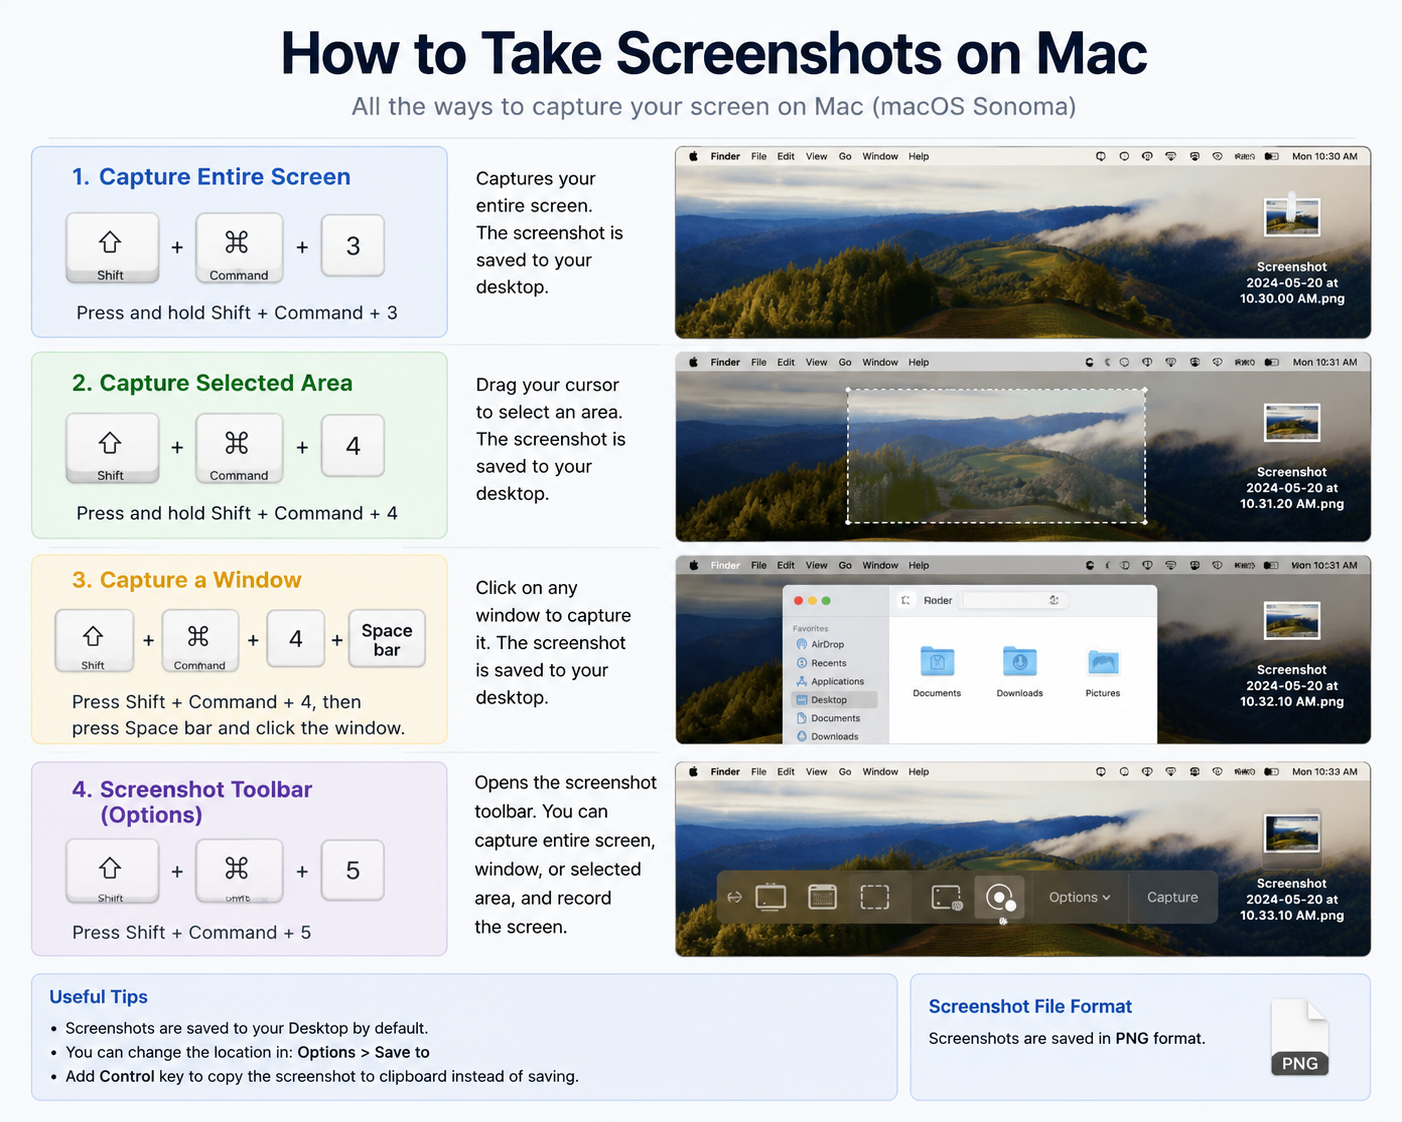
Method 1: Capture the Entire Screen
Keyboard Shortcut
Press:
Shift + Command (⌘) + 3
Steps
- Open the screen you want to capture.
- Press Shift + Command + 3.
- You’ll hear the camera shutter sound (if enabled).
- A thumbnail appears in the bottom-right corner.
- Click it to edit or wait for it to save automatically.
Result:
The entire display is captured.
Screenshot Placeholder
Insert Screenshot: Pressing Shift + Command + 3
Image Alt Text:
Mac keyboard shortcut Shift Command 3 to capture full screen
Method 2: Capture Part of the Screen
Keyboard Shortcut
Shift + Command + 4
Steps
- Press Shift + Command + 4.
- Your cursor changes into a crosshair.
- Click and drag to select the area.
- Release the mouse.
- The screenshot is saved automatically.
Perfect for capturing:
- Images
- Documents
- Error messages
- Specific menus
Screenshot Placeholder
Insert Screenshot: Selecting a screen area
Image Alt Text
Selecting an area for screenshot on Mac
Method 3: Capture a Specific Window
Shortcut
Shift + Command + 4
Then press Spacebar
Steps
- Press Shift + Command + 4.
- Press the Spacebar.
- The cursor changes into a camera.
- Move it over the desired window.
- Click the window.
The selected window will be captured with its shadow.
Screenshot Placeholder
Insert Screenshot: Camera icon over a Finder window
Image Alt Text
Capture a specific application window on Mac
Method 4: Open the Screenshot Toolbar
Keyboard Shortcut
Shift + Command + 5
This opens the built-in Screenshot Toolbar.
It allows you to:
- Capture Entire Screen
- Capture Selected Window
- Capture Selected Portion
- Record Entire Screen
- Record Selected Portion
- Set Timer
- Change Save Location
- Show Mouse Pointer
Screenshot Placeholder
Insert Screenshot: Screenshot toolbar
Image Alt Text
Mac Screenshot Toolbar options
Method 5: Take a Screenshot of the Touch Bar
(For Macs with a Touch Bar)
Shortcut:
Shift + Command + 6
The Touch Bar image is saved automatically.
Where Are Screenshots Saved?
By default, screenshots are saved on the Desktop.
Example filename:
Screenshot 2026-08-05 at 10.30.21 AM.png
Change Screenshot Save Location
- Press Shift + Command + 5
- Click Options
- Choose:
- Desktop
- Documents
- Downloads
- Clipboard
- Messages
- Preview
- Other Location
Copy Screenshot to Clipboard Instead of Saving
Add the Control key.
Example:
Control + Shift + Command + 3
or
Control + Shift + Command + 4
Now you can paste directly into:
- Microsoft Word
- Pages
- Photoshop
- Slack
Edit Screenshots Immediately
After taking a screenshot:
- Click the floating thumbnail.
- The Markup editor opens.
You can:
- Crop
- Draw
- Highlight
- Add arrows
- Add text
- Sign documents
- Rotate
- Resize
Screenshot Using Preview App
You can also use Preview.
Steps:
- Open Preview.
- Click File.
- Select Take Screenshot.
- Choose:
- From Selection
- From Window
- From Entire Screen
Screenshot Using Grab (Older macOS)
Older versions of macOS included the Grab application.
Newer versions replaced it with the Screenshot Toolbar.
Screenshot Keyboard Shortcut Summary
| Action | Shortcut |
|---|---|
| Entire Screen | Shift + Command + 3 |
| Selected Area | Shift + Command + 4 |
| Selected Window | Shift + Command + 4, then Space |
| Screenshot Toolbar | Shift + Command + 5 |
| Touch Bar | Shift + Command + 6 |
How to Take Scrolling Screenshots on Mac
macOS does not include a built-in scrolling screenshot feature for all apps.
You can use third-party tools such as:
- CleanShot X
- Snagit
- Shottr
- Microsoft Edge (Web Capture)
- Google Chrome extensions
How to Screenshot Without Keyboard Shortcuts
- Press Shift + Command + 5
- Use the Screenshot Toolbar.
- Click the capture option.
- Save the image.
Common Screenshot Problems
Screenshot Not Working
Try:
- Restart your Mac.
- Check keyboard shortcuts in System Settings.
- Make sure the keyboard is working.
- Update macOS.
Screenshot Saved But Can’t Find It
Search in Finder for:
Screenshot
Or check:
- Desktop
- Downloads
- Documents
Floating Thumbnail Doesn’t Appear
Go to:
Shift + Command + 5 → Options → Show Floating Thumbnail
Enable it.
Tips for Better Screenshots
- Close unnecessary windows.
- Hide personal information.
- Use a clean desktop background.
- Crop unwanted areas.
- Highlight important sections.
- Save screenshots in organized folders.
Frequently Asked Questions (FAQs)
How do I screenshot on a Mac?
Press Shift + Command + 3 to capture the entire screen or Shift + Command + 4 to select an area.
Where are screenshots saved?
By default, they are saved on the Desktop.
How do I take a screenshot of one window?
Press Shift + Command + 4, then Spacebar, and click the window.
Can I record my screen on a Mac?
Yes. Press Shift + Command + 5 and choose one of the screen recording options.
Can I change where screenshots are saved?
Yes. Open the Screenshot Toolbar with Shift + Command + 5, click Options, and select a different save location.
Conclusion
macOS makes taking screenshots simple with built-in keyboard shortcuts and the Screenshot Toolbar. Whether you need to capture the full screen, a specific window, or a selected area, these tools provide a fast and efficient way to create high-quality screenshots without installing additional software. By learning the shortcuts and customization options, you can improve your workflow and easily create screenshots for work, study, or personal use.